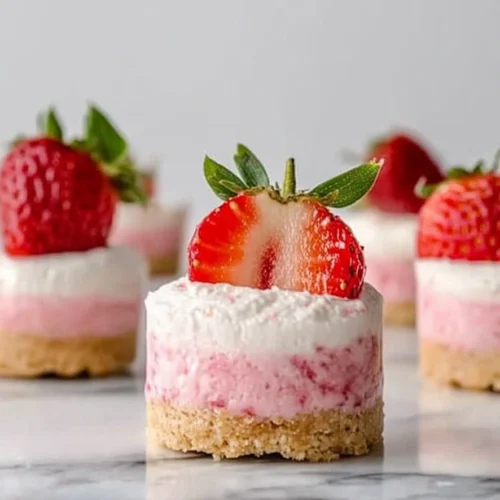
Okay, busy moms, if you’re planning a birthday party and need a fun treat that won’t stress you out, these Mini No-Bake Cheesecakes for Birthday Parties are about to be your new best friend. They’re sweet, creamy, and made in muffin tins (so cute, right?), plus, there’s zero baking involved. That means no ovens, no guesswork, and no melting down when things get hectic.
I started making these for my daughter’s birthday one year when I didn’t want to do a full cake, and now they’re a party tradition. Kids love the mini size, and you can dress them up with toppings to match any theme. Whether it’s sprinkles, berries, or a swirl of chocolate, there’s a version every little guest will gobble up.
They’re make-ahead, freezer-friendly, and totally mom-approved.
Want more nut-free, oven-free treats? Here are 20+ no-bake desserts for moms to try anytime.
Table of Contents
Recipe Card

Mini No-Bake Cheesecakes for Birthday Parties
Equipment
- Muffin pan (2 standard 12-count pans)
- Cupcake liners
- Hand mixer or stand mixer
- Mixing bowls
- Spatula
- Piping bag or zip-top plastic bag
Ingredients
- Click Bulk Add Ingredients and paste this list:
- For the crust
- 2 cups graham cracker crumbs about 16 full sheets
- 1/3 cup packed light or dark brown sugar
- 1/2 cup 8 Tbsp unsalted butter, melted
- For the filling
- 1 cup cold heavy cream
- 16 oz full-fat brick cream cheese softened
- 1/3 cup granulated sugar
- 2 Tbsp sour cream or plain yogurt
- 1 tsp fresh lemon juice
- 1/2 tsp pure vanilla extract
- Optional toppings
- Fresh berries
- Chocolate ganache
- Lemon curd
- Fruit preserves
- Sprinkles or mini candies
- Whipped cream and mint leaves
Instructions
- Line two 12-count muffin pans with cupcake liners. Make space in your fridge to chill both pans.
- In a bowl, mix graham cracker crumbs, brown sugar, and melted butter. Spoon about 1½ tablespoons into each liner and press firmly with the back of a spoon.
- Optional: Bake the crusts for 5 minutes at 350°F (177°C) for a firmer base. Let cool before adding filling.
- Whip the cold heavy cream into stiff peaks and set aside.
- In a separate bowl, beat cream cheese and sugar until smooth. Add sour cream, lemon juice, and vanilla; beat until fully combined.
- Gently fold in the whipped cream using a spatula.
- Spoon or pipe about 2 tablespoons of the filling over each crust. Smooth tops if needed.
- Chill cheesecakes in the refrigerator for at least 3 hours, or up to 2 days before serving.
- Add desired toppings just before serving. Store leftovers in the fridge for up to 5 days.
Notes
- Make Ahead & Freezing: You can refrigerate the cheesecakes for up to 2 days before serving, or freeze them in a single layer (with liners) in an airtight container for up to 3 months. Thaw in the fridge for 24 hours before serving.
- No Graham Crackers? Substitute with 2 cups crushed digestive biscuits and increase the sugar slightly.
- Room Temp Tip: Make sure your cream cheese and sour cream are at room temperature for a smooth, lump-free filling. Keep the heavy cream cold for whipping.
Why You’ll Love These Mini No-Bake Cheesecakes for Birthday Parties
These mini no-bake cheesecakes are a birthday party dream: cute, creamy, and ready without turning on the oven. They’re the perfect little indulgence for kids and grown-ups alike — no slicing, no mess, just grab-and-go deliciousness.
Here’s why they’re always a hit at parties:
- Perfect party portions – No need to cut or serve — just hand out and enjoy.
- No baking required – Prep them ahead and chill until party time.
- Customizable toppings – Add sprinkles, fruit, or chocolate chips to match the theme.
- Kid-friendly ingredients – Creamy, sweet, and no artificial stuff.
- Smarter sweetness – A fun dessert with built-in portion control [source].
Ingredients You’ll Need
This Mini No-Bake Cheesecakes for Birthday Parties recipe is made with just a few everyday staples, the kind of things you probably already have in your kitchen! It’s creamy, sweet, and surprisingly easy, with ingredients that come together in the yummiest little dessert cups.
- Graham cracker crumbs: These create that classic buttery crust kids (and adults!) love.
- Brown sugar & melted butter: Help bind the crust and add rich flavor.
- Cream cheese: The star of the show — go for full-fat blocks for the creamiest filling.
- Heavy cream: Whipped into soft peaks, this gives the cheesecake its light, fluffy texture.
- Sour cream, sugar, lemon juice, and vanilla: Together, they balance sweetness with just the right tang.
- Optional toppings: Think fresh berries, mini chocolate chips, or colorful sprinkles for party flair!
How to Make Mini No Bake Cheesecakes
- Before you begin, make sure there’s space in your fridge — you’ll need to tuck in two muffin pans, so clear a shelf if you can!
- Start by lining two 12-count muffin tins with cupcake liners. Don’t skip the liners — trust me, you’ll thank yourself later when it’s time to pop out the cheesecakes.
- Next, mix up the crust: graham cracker crumbs, brown sugar, and melted butter. Brown sugar works a little magic here by giving the crust extra hold and a hint of caramel flavor. Spoon about 1 ½ tablespoons into each liner and press it down firmly with the back of your spoon.
- Optional but helpful: You can give the crust a quick 5-minute bake at 350°F. I know, these are no-bake cheesecakes — and they still are! But I’ve found the crust holds up better with a brief bake. Totally fine to skip this step if you want to stay completely oven-free; your crust will just be a little more tender.
- Now for the dreamy filling. Whip cold heavy cream into stiff peaks — this gives the cheesecakes that lovely airy texture. In another bowl, beat together the cream cheese, sugar, sour cream, lemon juice, and vanilla until smooth. Then gently fold the whipped cream into the mix until combined and creamy.
- Spoon or pipe the filling on top of the crusts. I usually go with a piping bag (or even a zip-top bag with the corner snipped off!) for a neater finish, but spooning works just fine too.
- Finally, refrigerate the cheesecakes for at least 3 hours to set. Try not to rush it in the freezer — the crust can harden too fast and become tricky to bite into.
Fun Toppings for Mini No-Bake Cheesecakes
Now for the best part, the toppings! These Mini No-Bake Cheesecakes for Birthday Parties are the ultimate blank canvas. Whether you’re planning a rainbow-themed bash or a simple backyard get-together, you can totally customize them to match the vibe. Here are some fun ideas:
- Fresh fruit: Add a pop of color with sliced strawberries, blueberries, raspberries, or even kiwi!
- Chocolate ganache: Spoon a little over each cheesecake for a rich, fudgy twist.
- Sprinkles galore: Because what’s a birthday without sprinkles? Kids love ‘em, and they instantly make these feel party-ready.
- Lemon curd or jam: For a tangy-sweet finish, try a dollop of lemon curd, raspberry jam, or even apple butter.
- Mini candies: Think M&Ms, gummy bears, or mini marshmallows for a treat that doubles as decor.
- Whipped cream + mint leaves: For a light, fresh topping that looks extra fancy (but takes 2 seconds).
Tip: Add your toppings right before serving or after the cheesecakes have chilled for about an hour — this helps keep everything looking fresh and tidy!
Tips for the Perfect Mini No-Bake Cheesecakes for Birthday Parties
Here are a few tried-and-true tips from my kitchen to yours — because when you’re prepping Mini No-Bake Cheesecakes for Birthday Parties, you want everything to go off without a hitch!
- Use full-fat brick cream cheese: Not the spreadable kind! The bricks make for a firmer, creamier filling that holds up beautifully.
- Whip that cream well: Be patient when whipping your heavy cream — you want stiff peaks, not soft ones. This gives your filling its signature structure.
- Room temp ingredients = smooth filling: Make sure your cream cheese and sour cream are at room temperature before mixing. Cold ingredients = lumps.
- Don’t rush the chill time: Give these Mini No-Bake Cheesecakes for Birthday Parties a full 3 hours (or overnight!) to set in the fridge. The longer they chill, the better the texture.
- Pipe, don’t scoop (if you can): Piping the filling into the liners is cleaner and prettier — and way more fun if you’ve got little helpers!
Storage Tips for Mini No-Bake Cheesecakes for Birthday Parties
One more reason to love these Mini No-Bake Cheesecakes for Birthday Parties? They store beautifully — which means less party-day stress and more time to enjoy the fun!
- Fridge: Keep your Mini No-Bake Cheesecakes for Birthday Parties chilled in their liners, tightly covered with foil or plastic wrap. They’ll stay fresh for up to 5 days — perfect for prepping the night before a big bash.
- Freezer: You can also freeze these cheesecakes after they’ve set. Place them in a single layer (liners still on) in an airtight container and freeze for up to 3 months.
- Thawing: To serve frozen Mini No-Bake Cheesecakes for Birthday Parties, just move them to the fridge the day before. They’ll thaw overnight and taste just as creamy and dreamy.
- Toppings Tip: Wait to add toppings until after thawing (or right before serving) for the best texture and appearance.
Make-ahead treats like these take so much pressure off — and honestly, they’re one of the reasons I keep this recipe on repeat!
Frequently Asked Questions
How to Make a Mini Cheesecake (No-Bake Style!)
More details are in the recipe card below — including make-ahead tips, freezing instructions, and all your topping options!
Making a mini cheesecake with no baking required is easier than you think — and you don’t need any fancy pans or springform tricks. Here’s the quick rundown busy moms like us appreciate:
Start with a simple crust: Combine graham cracker crumbs, melted butter, and a touch of sugar. Press into lined muffin tins to form the base.
Whip up the filling: Beat softened cream cheese with sugar, sour cream, lemon juice, and vanilla. Fold in whipped cream to make it light and fluffy.
Assemble and chill: Spoon or pipe the filling onto the crusts, then chill for at least 3 hours until set.
Can I make these mini no-bake cheesecakes ahead of time?
Yes, absolutely! You can make them 1–2 days in advance and keep them covered in the fridge. They actually set up even better overnight, which makes party day a breeze.
Do I have to bake the crust?
Nope! Baking the crust is totally optional. I usually skip it if I’m short on time, but if you want a sturdier base that holds up to little hands, a quick 5-minute bake does help.
What if I don’t have graham crackers?
No problem — digestive biscuits work great too. Just make sure to crush them finely and add a bit more sugar if you want that same slightly sweet flavor.
Can I freeze them?
Yes! Once they’ve chilled and set in the fridge, you can freeze them in their liners in a sealed container. Thaw overnight in the fridge before serving. (Perfect for prepping way ahead!)
How do I keep the toppings fresh?
Add toppings right before serving, or after they’ve chilled for about an hour. This helps keep things looking cute and not soggy.
Let’s Celebrate with Cheesecake!
These Mini No-Bake Cheesecakes for Birthday Parties have become a go-to in our house — easy to prep, easy to love, and always a hit with the kiddos. Whether you’re planning a big birthday bash or just surprising your little one with something sweet, these mini treats are a joyful (and stress-free!) way to celebrate.
If you liked this recipe, you’ll love: No-Bake Peanut Butter Balls Without Chocolate (3 Ingredients) and 3-Ingredient No-Bake Brownie Bites (Nut-Free & Refined Sugar-Free).