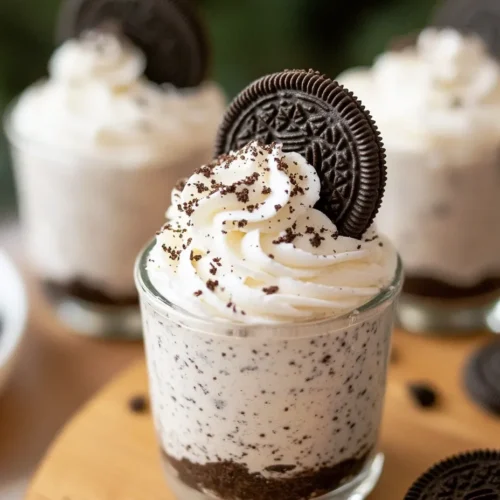
No-Bake Oreo Cheesecake Cups are my secret weapon on those busy, chaotic days when I need a fast dessert that still feels special. Between juggling homework help and the dinner rush, I love having an easy treat I can throw together without turning on the oven.
These creamy little cups are layered with crushed Oreos and a fluffy cheesecake filling, all without baking a thing. They’re perfect for after-school snacks, weekend treats, or even a last-minute dessert when company’s on the way. And yes, the kids can totally help make them (and will 100% want to lick the spoon).
Table of Contents
Ingredients Needed
You’ll only need a handful of simple ingredients to make these creamy, dreamy no-bake Oreo cheesecake cups. Each one plays a key role in building flavor and texture — no oven required!
Oreo Cookies: These are the star of the show! You’ll need crushed Oreos for the cookie base and a few more for folding into the creamy cheesecake filling. Their chocolatey crunch gives the perfect contrast to the soft filling — and let’s be honest, who doesn’t love Oreos?
Cream Cheese: Use full-fat cream cheese for that classic, rich cheesecake flavor. Make sure it’s softened to room temperature so it blends smoothly into the filling without lumps.
Powdered Sugar: Also called confectioners’ sugar, this adds just the right amount of sweetness without making the filling grainy. It dissolves easily into the cream cheese mixture and keeps the texture light.
Vanilla Extract: A splash of vanilla rounds out the flavor and enhances the sweetness of the Oreos and cream. It’s a small ingredient with a big impact — don’t skip it!
Heavy Whipping Cream: This is what makes the cheesecake light and mousse-like. When whipped and folded in, it creates that fluffy, cloud-like texture that’s irresistible. For best results, use cream that’s well chilled before whipping.
Butter: Melted butter is combined with the crushed Oreos to form a quick no-bake crust. It helps bind the crumbs together and adds richness that balances out the tangy filling.
Recipe Card
No Bake OREO Cheesecake Cups
Ingredients
- 1 1/2 cups heavy whipped topping
- 8 oz cream cheese softened
- 1/2 cup powdered sugar
- 1 package Family Size OREO cookies
- Whipped cream for topping
Instructions
- In a mixing bowl, beat the softened cream cheese until smooth.
- Add powdered sugar and mix until creamy.
- Fold in the whipped topping gently.
- Crush the OREO cookies in a zip-top bag using a rolling pin or mallet.
- Add a few spoonfuls of crushed OREOs to the bottom of each serving cup.
- Mix the rest of the crushed OREOs into the cheesecake mixture.
- Spoon the mixture into cups until about 3/4 full.
- Top with whipped cream and extra crushed OREOs (optional), plus a whole OREO on top if you’re feeling fancy.
- Chill in the fridge until ready to serve.
If you love this one, don’t miss our full collection of 20+ quick no-bake desserts for busy families.
Why You’ll Love These No-Bake Oreo Cheesecake Cups
If you’re an Oreo fan (or live with one), these no-bake cheesecake cups are about to become a favorite. Creamy, crunchy, and ridiculously easy to make, they deliver dessert-level satisfaction with zero baking and minimal mess.
Here’s why they’re always a hit in our house:
- No oven needed – Perfect for warm days, busy evenings, or anytime you want dessert without turning on the stove.
- Individually portioned – Serve them in jars or cups for a cute, grab-and-go treat that looks way fancier than it is.
- Rich and creamy texture – Thanks to the cream cheese and whipped topping combo, these No-Bake Oreo Cheesecake Cups are silky smooth with just the right cookie crunch.
- Fun to prep with kids – Let them crush the Oreos or spoon in the layers. It’s an easy dessert everyone can help with.
- Great for make-ahead – Pop them in the fridge and enjoy later — they chill beautifully.
Cream cheese is what gives these No-Bake Oreo Cheesecake Cups their ultra-smooth, tangy texture. It’s a fresh, soft cheese made from milk and cream, and it’s been a classic dessert base for over a century [source].
Mom Tips from Olivia
- No Oreos? No Problem – Swap in any chocolate sandwich cookie you have on hand. Even chocolate graham crackers can work in a pinch!
- Make-Ahead Magic – These No-Bake Oreo Cheesecake Cups keep beautifully in the fridge for up to 3 days. Just cover them tightly and chill until you’re ready to serve.
- Little Helpers Welcome – Let the kids crush the Oreos in a zip-top bag with a rolling pin. It’s noisy, fun, and great for getting them involved.
- Mix and Match Layers – Try layering with mini chocolate chips or a drizzle of caramel between the Oreo crust and cheesecake filling for a fun twist.
- Perfect Portions – Serve in small mason jars, plastic cups, or even cupcake liners for easy cleanup and grab-and-go dessert options.
Sure! Here’s a simple step-by-step breakdown for how to make No-Bake Oreo Cheesecake Cups — you can add this into your recipe card or share it as part of a tutorial post.
How to Make No-Bake Oreo Cheesecake Cups
- Beat the softened cream cheese in a mixing bowl until it’s smooth and fluffy.
- Add the powdered sugar and keep mixing until everything’s nice and creamy.
- Gently fold in the whipped topping — don’t overdo it, just enough to make it light.
- Place your OREO cookies in a zip-top bag and crush them with a rolling pin or mallet (a fun job for kids!).
- Spoon a little of the crushed OREOs into the bottom of each serving cup to make a tasty cookie layer.
- Stir the remaining crushed OREOs into your cheesecake mixture.
- Fill each cup about ¾ full with the cheesecake mix.
- Top with whipped cream, a sprinkle of extra cookie crumbs, and an OREO on top if you’re feeling fancy.
- Pop them in the fridge to chill until you’re ready to serve — the longer they sit, the better they set!
Frequently Asked Questions
Can I make no-bake Oreo cheesecake cups ahead of time?
Absolutely! These no-bake Oreo cheesecake cups are actually better when made ahead. The flavors have time to meld, and they firm up nicely in the fridge.
Do I need to remove the filling from the Oreos?
Nope! Use the whole cookie — cream and all. It adds extra flavor and helps bind the crust layer.
Can I use store-brand cookies instead of Oreos?
Yes! Most chocolate sandwich cookies work just as well. Choose your favorite and crush away.
How long do these cheesecake cups need to chill?
Give them at least 2 hours to set in the fridge, but overnight is even better for a firmer texture.
Can I freeze Oreo cheesecake cups?
You sure can. Just wrap them well and freeze for up to a month. Thaw in the fridge before serving.
Final Thoughts
These No-Bake Oreo Cheesecake Cups are dangerously easy to make — and even easier to love. Whether it’s a last-minute dessert for guests, a fun weekend treat for the kids, or just a “you deserve it” moment after a long day, these creamy little jars always deliver.
They’re the perfect mix of crunchy, creamy, and just the right amount of sweet — no oven, no fuss, no leftovers guaranteed.
If you liked this recipe, you’ll love 3-Ingredient No-Bake Cheesecake Cups Without Condensed Milk — and don’t miss Nut-Free No-Bake Cookies for School Lunches too!