Let’s talk about a classic treat that never goes out of style, easy chocolate covered Rice Krispie treats. If your house is anything like mine, these gooey, chocolatey bars disappear almost as fast as I make them! They’re the perfect mix of crunchy, sweet, and chewy, and best of all, they’re no-bake, which means no oven and no fuss.
These bars are my go-to for everything from picnic desserts to last-minute birthday snacks. With just a few pantry staples and a microwave, you’ve got a tray of homemade Rice Krispie snacks that the whole family will devour. Whether you’re packing for a road trip, beach day, or need a quick dessert for a summer party, these kid-friendly dessert bars always come to the rescue.
Table of Contents
Recipe Card
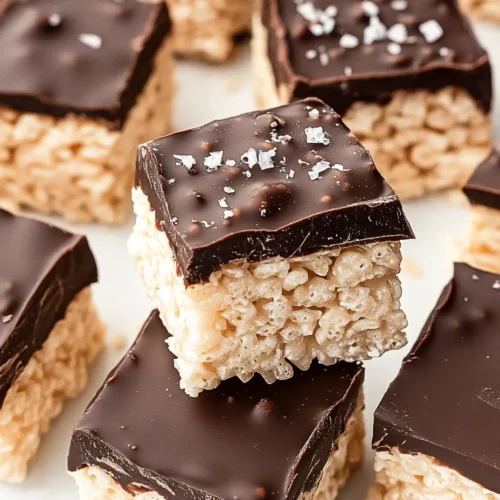
Chocolate Covered Rice Krispie Treats
Equipment
- 1 large pot
- 1 8×8 or 9×9 square baking pan
Ingredients
- 6 Tablespoons butter regular or dairy free
- 7 cups mini marshmallows separated
- 1 teaspoon real vanilla extract
- 5 cups Rice Krispies cereal
- Chocolate Coating
- 1 cup semisweet chocolate chips or chopped chocolate or white or milk chocolate, regular or vegan
- 1½ Tablespoon butter regular or dairy free
- flakey sea salt or sprinkles for topping (optional)
Instructions
- Line an 8×8 or 9×9 baking pan with parchment paper.
- In a large pot, melt the butter over medium heat.
- Add 6 cups of marshmallows (leaving one cup to the side!) and stir with the melted butter until the marshmallows have melted. Stir in the vanilla extract.
- Add in the rice krispie cereal and remaining cup of marshmallows. Stir quickly until combined.
- Pour the rice krispie mixture into your lined pan and use a greased spatula or your hands to gently press the mixture down into an even layer.
- In a small microwave safe bowl, melt the butter and chocolate in 20 second increments, stirring after each one, until completely melted.
- Pour the melted chocolate over the cereal and use an offset spatula to spread into an even layer. Sprinkle over sea salt or sprinkles! Let the chocolate covered rice krispie treats set completely before removing and slicing.
Notes
- For thicker chocolate, use 1½ cups chocolate + 2 tbsp butter.
- To set the chocolate faster, chill the bars in the fridge.
- Large marshmallows work too — chop them into smaller pieces.
- Recipe doubles easily in a 9×13 pan.
- Store in an airtight container for up to 3 days.
Why You’ll Love These Easy Chocolate Covered Rice Krispie Treats
There are about a dozen reasons these easy chocolate covered rice krispie treats are on constant repeat in our kitchen:
- Quick and No-Bake: No oven, no problem! They come together in just 10 minutes.
- Kid-Approved: These bars are chewy, chocolatey, and always a hit with the little ones.
- Perfect for Any Occasion: From lunchboxes to birthday parties, they fit right in.
- Pantry-Friendly: You probably have everything on hand already.
- Customizable: Add your favorite toppings or mix-ins for a personal touch.
- Make-Ahead Friendly: These homemade Rice Krispie snacks hold up beautifully for days.
They check all the mom boxes, easy, mess-free, and totally delicious!
Ingredients You’ll Need
One of the best parts about these easy chocolate covered Rice Krispie treats is how simple the ingredient list is. You probably already have most of this in your kitchen!
Here’s what you’ll need:
- 6 cups Rice Krispies cereal – or any puffed rice cereal you like
- 1/4 cup unsalted butter – adds richness and helps melt the marshmallows
- 1 (10 oz) bag mini marshmallows – makes the bars soft, gooey, and sweet
- 1/2 teaspoon vanilla extract – just a splash to boost the flavor
- 1 1/2 cups semi-sweet chocolate chips – for that delicious chocolate coating
- 1 tablespoon coconut oil or butter – helps the chocolate melt smooth and glossy
- Optional sprinkles or sea salt – for fun or a sweet-salty twist
Tip: If you’re making these as back-to-school treats, let the kids pick the sprinkles — it makes them feel part of the process!
Topped with a smooth layer of chocolate, these treats aren’t just kid-approved — they bring a little antioxidant boost too. According to Harvard, dark chocolate (in moderation) can support heart health and even improve mood [source].
Mom Tips from Olivia
Let the kids help
These treats are so easy, the kiddos can jump right in! Pouring cereal, sprinkling toppings, and even helping spread the chocolate makes snack time extra fun.
Press fast but gently
Once the marshmallow mix hits the cereal, you’ve got to move quickly. I like to use wax paper or a buttered spatula to press down the mixture evenly — it keeps the bars soft and chewy, just the way we like our easy chocolate covered rice krispie treats.
Use quality chocolate
The chocolate layer really makes these bars shine! A smooth, semi-sweet chocolate works best and balances the sweetness perfectly.
Chill smart
Pop the pan in the fridge for about 30 minutes to help the chocolate set. But don’t forget — letting your easy chocolate covered rice krispie treats sit out for a few minutes before cutting makes slicing a breeze.
Make them travel-ready
These bars are perfect for road trips, vacation snacks, or sunny park days. Wrap each one in parchment or pop them into snack containers for an easy, grab-and-go treat.
Storage Tips for Chocolate Covered Rice Krispie Treats
Once you’ve made your delicious batch of easy chocolate covered rice krispie treats, here’s how to store them for maximum freshness:
Room Temp:
Store in an airtight container on the counter for up to 3 days. Keep them in a cool spot so the chocolate doesn’t melt.
Fridge:
For longer storage, pop them in the fridge. They’ll stay fresh for up to a week — just let them sit at room temp a few minutes before serving so the chocolate softens a bit.
Freezer:
Wrap individual bars in parchment and place them in a freezer-safe zip bag. Freeze for up to 2 months. Great for prepping back-to-school treats in advance!
Frequently Asked Questions About Easy Chocolate Covered Rice Krispie Treats
Can I make these easy chocolate covered Rice Krispie treats ahead of time?
Absolutely! These treats keep well in an airtight container for up to 5 days. If you’re prepping for a party or school event, you can even make them a day or two ahead and store them in the fridge.
Do I have to use chocolate chips?
Not at all. You can use melting wafers, chopped chocolate bars, or even white chocolate for a twist. Just be sure to add a little coconut oil or butter to help it melt smoothly.
How do I keep the treats from sticking to the pan?
Line your baking dish with parchment paper or spray it lightly with nonstick spray. This helps the chocolate covered Rice Krispie treats pop right out with zero mess.
Can I freeze these bars?
Yes! Cut the bars into squares, wrap them individually in plastic wrap, and freeze in a zip-top bag. Thaw at room temp before serving. They’re great to stash for future kid-friendly dessert bars emergencies!
What can I add for extra flair?
Try mixing in crushed pretzels, mini M&Ms, or a swirl of peanut butter into the chocolate layer. It’s an easy way to make your easy no-bake chocolate bars feel extra special.
Final Thoughts
These chocolate-covered Rice Krispie treats are proof that you don’t need to be a pastry chef to make something fun, sweet, and totally irresistible. Whether you’re whipping them up for a bake sale, birthday party, or just a weekday treat, they always deliver that perfect mix of chewy and chocolatey.
Best part? No oven, no stress, and just a handful of ingredients.
Still hungry? These no-bake favorites are also on repeat at our house: No-Bake Lemon Cheesecake Jars (Mason Jar Dessert Idea) and Biscoff Cheesecake No Bake.